Thursday, February 24, 2011

Gluten free heaven in New York City

Gluten free heaven in New York City: Friendly restaurants and bakeries

September 17th, 2009 by Monica Rozenfeld
Although gluten-free eating is not impossible to do in most any restaurant including (but much harder) in Italian settings, there are restaurants and bakeries appearing throughout the City which tailor specifically to the gluten-free crowd. Below is a listing of several of the most talked about places. If you have dined here, or planning to, we would love to hear your recommendations!
Risoterria
270 Bleeker Street, btwn 6th and 7th Ave.
www.Risotteria.com
Everything from pasta dishes, to paninis, to cookie dough All gluten-free.
Friedman’s
75 Ninth Avenue, at Chelsea market
www.Friedmanslunch.com
A great lunch place where all items on the menu (even sandwiches) can be served gluten-free.
Candle Café
1307 Third Avenue, btwn 74th and 75th
www.CandleCafe.com
A café specializing in healthy eating, this place has a separate menu for the gluten-free diner.
BabyCakes
248 Broome Street
www.BabyCakesNYC.com
The refined sugar-free, gluten-free, vegan, kosher bakery. A gluten girls dream come true.
——————–
Author Information: Monica Rozenfeld, NYC, NY
http://www.examiner.com/x-10574-NY-Gluten-Free-Examiner
writelyrozen@gmail.com

Monday, February 21, 2011

Loco for Chocolate?


This cake features both chocolate and cocoa; the combination gives it a rich, dark color, and deep chocolate flavor. A chocolate ganache glaze takes it over the top. And, since it contains neither flour nor leavening, it’s perfect for Passover. Step-by-step photos illustrating how to make this cake are available at Bakers’ Banter, our King Arthur blog.
Cake
1 cup (6 ounces) chopped semisweet chocolate or chocolate chips
1/2 cup (1 stick, 4 ounces) unsalted butter
3/4 cup (5 1/4 ounces) granulated sugar
1/8 teaspoon salt
1 to 2 teaspoons espresso powder, optional
3 large eggs
1/2 cup (1 1/2 ounces) unsweetened cocoa powder, Dutch-process preferred

Glaze
1 cup (6 ounces) chopped semisweet chocolate or chocolate chips
1/2 cup (4 ounces) heavy cream

Topping
1/4 cup sliced almonds, toasted in a 350°F oven till golden brown, about 10 minutes
Preheat the oven to 375°F. Lightly grease an 8" round cake pan; cut a piece of parchment or waxed paper to fit, grease it, and lay it in the bottom of the pan.

To make the cake: Put the chocolate and butter in a microwave-safe bowl, and heat till the butter is melted and the chips are soft. Stir until the chips melt, reheating briefly if necessary. You can also do this over a burner set at very low heat. Transfer the melted chocolate/butter to a mixing bowl.

Add the sugar, salt, and espresso powder. Espresso enhances chocolate’s flavor much as vanilla does; using 1 teaspoon will simply enhance the flavor, while 2 teaspoons will lend a hint of mocha to the cake. Add the eggs, beating briefly until smooth. Add the cocoa powder, and mix just to combine.

Spoon the batter into the prepared pan. Bake the cake for 25 minutes; the top will have formed a thin crust. Remove it from the oven, and cool it in the pan for 5 minutes. Loosen the edges of the pan with a table knife or nylon spreader, and turn it out onto a serving plate. The top will now be on the bottom; that’s fine. Also, the edges will crumble a bit, which is also fine. Allow the cake to cool completely before glazing.

To prepare the glaze: Combine the chocolate and cream in a microwave-safe bowl, and heat till the cream is very hot, but not simmering. Remove from the microwave, and stir till the chocolate melts and the mixture is completely smooth.

Spoon the glaze over the cake, spreading it to drip over the sides a bit. Allow the glaze to set for several hours before serving the cake.
Yield: one 8" cake, 12 rich servings.

Girl Scout Cookies... Gluten Free... You don't say...

The following recipes have been borrowed (and tweaked) from Baking Bites... Click here to find more Girl Scout Cookie Recipes: http://bakingbites.com/2009/01/homemade-girl-scout-cookie-recipes/
Homemade Thin Mints
Homemade Thin Mints
2 1/4 cups Gluten Free Flour (Bob's RedMill suggested)
1/4 cup cornstarch
6 tbsp unsweetened cocoa powder
1/2 tsp salt
1 cup white sugar
1/2 cup butter, room temperature
1/3 cup milk (any kind)
1/2 tsp vanilla extract
3/4 tsp peppermint extract
In a small bowl, whisk together flour, cornstarch, cocoa powder and salt.
In a large bowl, cream together butter and sugar. With the mixer on low speed, add in the milk and the extracts. Mixture will look curdled. Gradually, add in the flour mixture until fully incorporated.
Shape dough into two logs, about 1 1/2 inches (or about 4 cm) in diameter, wrap in plastic wrap and freeze for at least 1-2 hours, until dough is very firm.
Preheat oven to 375F.
Slice dough into rounds not more than 1/4 inch thick – if they are too thick, they will not be as crisp – and place on a parchment lined baking sheet. Cookies will not spread very much, so you can put them quite close together.
Bake for 13-15 minutes, until cookies are firm at the edges. Cool cookies completely on a wire rack before dipping in chocolate.
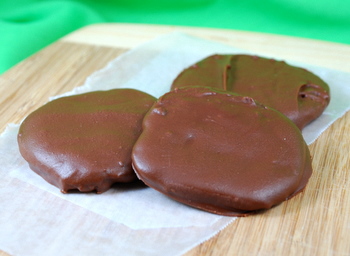
Dark Chocolate Coating
10-oz dark or semisweet chocolate
1/2 cup butter, room temperature
In a microwave safe bowl, combine chocolate and butter. Melt on high power in the microwave, stirring every 45-60 seconds, until chocolate is smooth. Chocolate should have a consistency somewhere between chocolate syrup and fudge for a thin coating.
Dip each cookie in melted chocolate, turn with a fork to coat, then transfer to a piece of parchment paper or wax paper to set up for at least 30 minutes, or until chocolate is cool and firm.
Reheat chocolate as needed to keep it smooth and easy to dip into.
Makes 3 1/2-4 dozen cookies.
Samoas Bars
Homemade Samoas Bars
Cookie Base:
1/2 cup sugar
3/4 cup butter, softened
1 large egg
1/2 tsp vanilla extract
2 cups  Gluten Free Flour (Bob's RedMill suggested)
1/4 tsp salt
First, make the crust.
Preheat oven to 350F. Lightly grease a 9×13-inch baking pan, or line with parchment paper.
In a large bowl, cream together sugar and butter, until fluffy. Beat in egg and vanilla extract. Working at a low speed, gradually beat in flour and salt until mixture is crumbly, like wet sand. The dough does not need to come together. Pour crumbly dough into prepapred pan and press into an even layer.
Bake for 20-25 minutes, until base is set and edges are lightly browned. Cool completely on a wire rack before topping.
Topping
3 cups shredded coconut (sweetened or unsweetened)
12-oz good-quality chewy caramels
1/4 tsp salt
3 tbsp milk
10 oz. dark or semisweet chocolate (chocolate chips are ok)
Preheat oven to 300. Spread coconut evenly on a parchment-lined baking sheet (preferably one with sides) and toast 20 minutes, stirring every 5 minutes, until coconut is golden. Cool on baking sheet, stirring occasionally. Set aside.
Unwrap the caramels and place in a large microwave-safe bowl with milk and salt. Cook on high for 3-4 minutes, stopping to stir a few times to help the caramel melt. When smooth, fold in toasted coconut with a spatula.
Put dollops of the topping all over the shortbread base. Using the spatula, spread topping into an even layer. Let topping set until cooled.
When cooled, cut into 30 bars with a large knife or a pizza cutter (it’s easy to get it through the topping).
Once bars are cut, melt chocolate in a small bowl. Heat on high in the microwave in 45 second intervals, stirring thoroughly to prevent scorching. Dip the base of each bar into the chocolate and place on a clean piece of parchment or wax paper. Transfer all remaining chocolate (or melt a bit of additional chocolate, if necessary) into a piping bag or a ziploc bag with the corner snipped off and drizzle bars with chocolate to finish.
Let chocolate set completely before storing in an airtight container.
Makes 30 bar cookies.
Note: You can simply drizzle chocolate on top of the bars before slicing them up if you’re looking for yet an easier way to finish these off. You won’t need quite as much chocolate as noted above, and you won’t quite get the Samoas look, but the results will still be tasty.

Homemade Tagalongs (a.k.a. Peanut Butter Patties)
Cookies
1 cup butter, soft
1/2 cup sugar
2 cups  Gluten Free Flour (Bob's RedMill suggested)
1/4 tsp baking powder
1/2 tsp salt
1/2 tsp vanilla extract
2 tbsp milk
Preheat oven to 350F.
In a large mixing bowl, cream together butter and sugar. Mix in flour, baking powder and salt at a low speed, followed by the vanilla and milk. The dough should come together into a soft ball.
Take a tablespoon full of dough and flatten it into a disc about 1/4-inch thick. Place on a parchment-lined baking sheet and repeat with remaining dough. Cookies will not spread too much, so you can squeeze them in more than you would for chocolate chip cookies. (Alternatively, you can use a cookie cutter, as described in the post above).
Bake cookies for 11-13 minutes, until bottoms and the edges are lightly browned and cookies are set.
Immediately after removing cookies from the oven, use your thumb or a small spoon to make a depression in the center of each cookie
Cool for a few minutes on the baking sheet then transfer to a wire rack to cool completely.
Filling
1 1/2 cups creamy peanut butter (natural or regular)
3/4 cup confectioners’ sugar*
generous pinch salt
1/2 tsp vanilla extract
about 8-oz semisweet chocolate
In a small bowl, whisk together peanut butter, confectioners’ sugar, salt and vanilla. When the mixture has come together, heat it in the microwave (again in short intervals, stirring frequently), until it is very, very soft. Working carefully with the hot filling, transfer it to a pastry bag (or plastic bag with the tip cut off) and pipe a generous dome of the filling into each cookie’s “thumbprint”.
Chill cookies with filling for 20-30 minutes, or until the peanut butter is firm.
Melt the chocolate in a small, heat-resistant bowl. This can be done in a microwave (with frequent stirring) or on a double boiler, but the bowl of melted chocolate should ultimately be placed above a pan of hot, but not boiling, water to keep it fluid while you work.
Dip chilled cookies into chocolate, let excess drip off, and place on a sheet of parchment paper to let the cookies set up. The setting process can be accelerated by putting the cookies into the refrigerator once they have been coated.
Makes about 3-dozen
*You might need slightly less sugar if you’re using the conventional peanut butter, as it tends to be a bit sweeter. Taste the filling before using to make sure you like the sweet/savory balance.

The HEAT IS ON....

The race, the battle... The Winner? Two people know what I am talking about. One, namely Christopher Hickey, has a breakfast burrito so wonderful, he hardly makes it... keeps you on your toes, wanting more (a very normal occurrence once you get to know this fine lad). The other, Vanessa Frosini, presenting me with the amazing and finger licking (yes, I did lick my fingers) breakfast tacos, as seen above. Us GLUTARDS- embrace it, I just learned this term and it is not only fantastic, it might be the most amazing thing ever!- don't have an easy way about breakfast. We can't just grab a sandwich, bagel, english muffin, toast, muffin, crumbcake, I could go on but for everyone out there's sake, I will stop. Anyone who knows me, knows this is an issue. So when breakfast can be something so wonderful and fresh, why complain?
Let's discuss the breakdown of Vanessa's fabulous meal:
It start's with a nicely heated/bronzed corn tortilla. Added to that are a few things, fresh salsa and refried black beans from Du Soleil, located in New Canaan, but also at the Weston Farmers Markets on Saturdays. A little dollop of sour cream, and eggs so fresh, literally probably came from a chicken just a few days ago! The eggs, also bought at the Weston Farmers Market, are from Daffodil Hill Growers at Woodside Farm in Southbury CT "home of the happy hen, cage free and free range".
So I am not really sure I can call a winner between the two- I might not get breakfast again! But the details are fresh and simple (most of all Gluten Free), and both can be made with a little love! So if your like me, it's easy: Stop Complaining and Start Cooking!

Need a Jolt?

Close your eyes. Imagine heaven. Open them... and there before you is a Cold Roman. A cold what you say? A Cold Roman. I am not really sure where the name came from, I am not really sure what is in it (other than NO gluten), and I am not really sure what the proper name is for such a delicious treat. It has been called a Cold Roman and it has been called a Dirty Roman, but lets face it, whatever you want to call it- it's so good it is dirty.  This drink doesn't really need an introduction, or a blog, because once your lips have hit the glass and taken a sip, you have been won over, I don't care who you are. I don't care how much you know about coffee, because the fact is, Raus Coffee is on to something! Raus Coffee "coffee for humanity" is a little company run by what some may call a genius Donny Raus. I can't believe that I don't know how old Donny is but he can't be older than 28, and he certainly hasn't hit his prime, so I can't wait for what is to come. Donny is a young hard worker that simply created a brilliant product. Say no more you say- just give me the details of how to get my hands on the product... I get it. And speaking of getting it, I probably will not get it next time at the Farmers Market in Westport, because I am assuming the cat is out of the bag and there will not be any left. So there you have it- Westport Farmers Market- Thursdays at Gilberties (inside, it's warm!). Come grab a cup, or bring a bottle and grab a bottle, but whatever you do, come early- it sells out!
Oh, I almost forgot!!! If your just an average Joe coffee drinker- which I thought I was- he also has delicious, freshly brewed coffee too! He sells his coffee in whole beans or will grind them for you. So really what do you have to lose? Lay off the Starbucks for a day, believe me- it's worth it!

It's a Pizza Party! That's Amore!

I know I've (said) written it before, and it probably is getting old, but it's kinda new... and it's kinda delish! PIZZA that is... Downtown Westport Pizza (right across the street from Vineyard Vines) has Gluten Free pizza. The boys at Fat Cat are going to kill me for this post!!! They got Gluten Free pizza in just for me - eek!!!!! But if I can look beyond friendships and just comment on food, I can also say it's not spinning wheel- thank god- and it's not something made of sooo much cheese you get sick from that, it's just good GLUTEN FREE PIZZA. Enough said. Case. Point. Nervous about cross contamination you say- they present and cook the pizza on it's own disposable aluminum tray, so that it never even touches the oven. They serve it up hot and they serve it up good! If you want to order the way I did, then spin it up with some gorg and some spicy cherry peppers. The list goes on and on for toppings, so I am sure whatever you are craving you will find. In fact, I woke up craving pizza again- let's be honest, when was the last time you craved a Gluten Free Pizza?!?!?!
One little last point- THEY DELIVER (add a dollar if you are outside Westport- I am, and do- it's worth it!)

Location:
107 Main Street
Westport, CT 06880
203-226-4094
Hours:
Monday - Saturday
11:00 a.m. - 11:00 p.m.
Sunday
12:00 p.m. - 10:00 p.m.

Oh and don't forget the toppings!
Toppings
Anchovies, Artichokes, Bacon, Broccoli, Chicken, Cheese, Clams, Eggplant, Garlic, Gorg, Ham, Hot Cherry Peppers, Meatballs, Mushroom, Olives, Onion, Pepperoni, Peppers, Pinapple, Riccotta, Salad Pizza, Salami, Sausage, So So Hot, Tomatoes, Tuna, Extra Mozz, Extra Sauce

Friday, February 4, 2011

It's Time to Make Whoopie!


2011_02_01-135054-GFTues-WhoopiePie.jpg
As someone who grew up near New England (whoopie pie territory) I always felt that packaged chocolate snack cakes, like Suzy Q's, were a poor imitation of the whoopie pie. When I want chocolate cakes sandwiched together with sweet, creamy icing, nothing but a whoopie pie will do.
This recipe makes traditional chocolate whoopie pies. The cakes are large, dense, and not too sweet. The filling—made from marshmallow Fluff, sugar, and butter—brings just the right amount of sweetness to the cake.
Since whoopie pies occasionally suffer from dryness, I use dark brown sugar in the recipe. It keeps the cakes moist while still retaining a dense, cakey texture.
As for the size, you'll notice that the recipe calls for about ¼ cup of batter for each cake. WARNING: this makes large whoopie pies. Feel free to reduce the amount of batter for smaller ones. For really tiny ones, use just a tablespoon of batter per cake and reduce the baking time. Keep your eye on the first batch to get the timing right.
About the author: Elizabeth Barbone of GlutenFreeBaking.com joins us every Tuesday with a new gluten-free recipe. Elizabeth is an alumna of the Culinary Institute of America and Mount Mary College. With her solid professional baking background, Elizabeth is known for creating gluten-free recipes that taste just like their wheat counterparts. She is the author of Easy Gluten-Free Baking.

INGREDIENTS

serves 8 whoopie pies, active time 20 minutes, total time one hour
  • For the Cookies
  • Dry Ingredients
  • 4 ounces (1 cup) white rice flour
  • 2 3/4 ounces(1/2 cup) sweet rice flour
  • 1 1/2 ounces (1/2 cup) Dutch-process cocoa powder (regular cocoa powder works as well but the finished cakes won't be as dark.)
  • 2 1/4 ounces (1/2 cup) tapioca starch
  • 1 1/4 teaspoons baking soda
  • 1 teaspoon salt
  • 1/2 teaspoon xanthan gum
  • Wet Ingredients
  • 4 ounces (1 stick) unsalted butter, room temperature
  • 7 ounces (1 cup) dark brown sugar
  • 1 large egg
  • 1 teaspoon vanilla extract
  • 1 cup buttermilk
  • For the Filling
  • 4 ounces (1 stick) butter, softened
  • 1 (7 1/2 ounce) jar marshmallow crème (I used Marshmallow Fluff)
  • 3/4 cup confectioners’ sugar
  • 1 teaspoon vanilla extract
Procedure: 
For the cookies Center oven rack to middle position and preheat oven to 350°F. Line a baking sheet with parchment paper and set aside.
In small mixing bowl, whisk together white rice flour, sweet rice flour, cocoa powder, tapioca starch, baking soda, salt, and xanthan gum.Fit stand mixer with paddle attachment. In bowl of stand mixer, cream together butter and brown sugar until butter-sugar paste lightens slightly, about one minute. (Use medium high-speed on a stand mixer. If using a handheld mixer, use high speed.) Turn off mixer. Scrape down sides and bottom of bowl. Add egg and vanilla extract. Turn mixer back on. Cream until egg is thoroughly incorporated, about one minute. Scrape down bottom and sides of bowl. Mix for 15 seconds. Add 1/3 of the dry ingredients. Mix until combined. Add half the buttermilk. Mix until batter is smooth. Add another 1/3 of the dry ingredients. Mix until combined. Add remaining buttermilk. Add remaining dry ingredients. Mix batter until smooth and thick, about 30 seconds.Scoop six mounds of batter, about 1/4 cup each, onto prepared baking sheet. Space cookies several inches apart as they spread during baking.Remove pan from oven. Allow cookies to cool on pan for one minute. Using a metal spatula, transfer cookies to wire rack to cool. Repeat with remaining batter.While cookies cool, make filling. (method below) Sandwich cooled cookies together with icing.For the filling In medium mixing bowl, cream together butter and confectioners’ sugar until light and fluffy, about 30 seconds. (Use high speed on a handheld mixer or medium-high speed on a stand mixer.) Add marshmallow crème and vanilla. Mix until fluffy.